How to Build a Salesforce CI/CD Pipeline Using GitHub Actions
Salesforce development has come a long way from the days of manually pushing changes through Change Sets. As teams scale and releases become more frequent, manual deployments quickly turn into bottlenecks.
That’s where CI/CD (Continuous Integration and Continuous Delivery) comes in.
A proper pipeline automates the process of validating, testing, and promoting changes across environments, from development all the way to production. While many teams use commercial DevOps platforms, it is still useful to understand how the underlying automation works.
In this guide, we will walk through how Salesforce CI/CD pipelines work today, how to build one using GitHub Actions, and which approaches work best depending on your team size, release cadence, and organisational complexity.
We will also look at where DIY pipelines start to struggle and why many teams eventually move to a dedicated Salesforce DevOps platform once their process matures.
Why CI/CD Matters for Salesforce
Salesforce development is different from traditional application development.
Instead of shipping compiled applications, Salesforce teams deploy metadata and configuration such as:
-
Apex classes and triggers
-
Lightning Web Components
-
Flows and automation
-
Profiles and permission sets
-
Objects, fields, layouts, and schema
Without automation, deployments quickly become fragile.
Typical issues include:
-
Configuration drift between environments
-
Broken deployments due to missing dependencies
-
Manual deployment mistakes
-
Limited visibility into what actually changed
-
Poor traceability between work items and release content
CI/CD pipelines address these issues by:
-
validating changes automatically
-
running tests before deployment
-
keeping Git as the source of truth
-
promoting only approved changes
-
keeping environments consistent over time
Salesforce Development Models
1. Org-Based Development
This is still the most common model.
Developers make changes directly in sandboxes and move those changes through environments such as:
Developer Sandbox
      ↓
QA
      ↓
UAT / Staging
      ↓
Production
Metadata is retrieved from the org and committed to Git. CI/CD pipelines validate and promote that metadata across environments.
Many enterprise teams still operate this way, even when they start introducing unlocked packages later in the release flow.
2. Package-Based Development
Package-based development uses modular packages instead of promoting the entire org metadata tree as a single unit.
Each package represents a logical feature set or domain. This approach is common for:
-
ISVs
-
AppExchange partners
-
large enterprise teams with multiple parallel workstreams
The reality is that many teams start in an org-based model and gradually adopt packages for release versioning and cleaner promotion.
Recommended CI/CD Patterns by Team Size
Smaller Teams
For very small teams, for example two or three contributors, too many environments can create more overhead than value. In that case a leaner process is usually better.
Developer Sandbox
      ↓
Retrieve to Git
      ↓
Pull Request validation
      ↓
Build unlocked package version
      ↓
Install in Staging / QA Sandbox
      ↓
Regression / signoff
      ↓
Install same package version in Production
This works well when:
-
the team is small and closely coordinated
-
release frequency is high
-
one shared staging or QA environment is enough for final validation
-
the team wants discipline without too much process overhead
The key point is that even a small team still needs a clean release process. It just should not be heavier than the team itself.
Growing and Larger Teams
As teams grow, a dedicated QA environment becomes useful for validating integrated source changes before a release candidate is built.
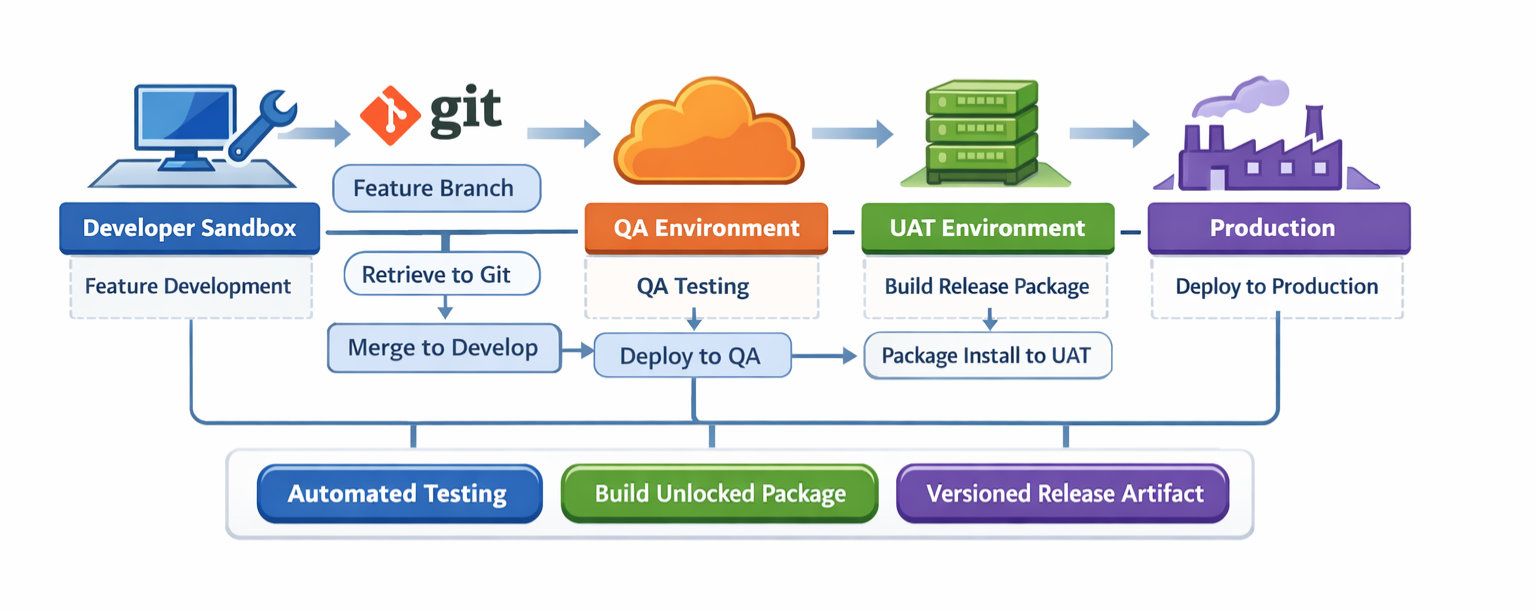
Developer Sandbox
      ↓
Retrieve to Git
      ↓
Feature branch
      ↓
Pull Request validation
      ↓
Merge to develop
      ↓
Deploy source to QA
      ↓
Create release branch
      ↓
Build unlocked package version
      ↓
Install package in UAT
      ↓
Regression / business signoff
      ↓
Install same package version in Production
This model is stronger for larger teams because QA and UAT serve different purposes:
-
QA validates integrated source changes from multiple contributors
-
UAT validates the actual release artifact
-
Production receives the same package version that passed UAT
That gives better release traceability, cleaner rollback options, and fewer surprises in production.
ISVs
ISVs often follow similar principles, but their workflows are more package-led from the beginning.
Scratch Org / Dev Org
      ↓
Source tracked to Git
      ↓
Pull Request validation
      ↓
Package version build
      ↓
Install in internal test org
      ↓
Install in staging / UAT
      ↓
Promote release artifact
The same ideas still apply: Git as the source of truth, clear promotion steps, and versioned release artifacts.
Advanced Teams and Modular Packages
As the Salesforce org becomes larger and more domain-heavy, a single unlocked package can become too broad. At that point, modular unlocked packages usually make more sense.
Examples might include:
-
sales pipeline and opportunity management package
-
service operations package
-
customer onboarding package
-
core automation package
This is especially useful in large companies where multiple teams are working on different domains in parallel. As the team grows or the org becomes more complex, the DevOps process has to grow with it to preserve speed, quality, visibility, and traceability.
Branching Strategy for Salesforce CI/CD
Before building the pipeline, decide how work will move through Git. The two most common strategies are GitFlow and trunk-based development.
GitFlow
main      → production history
develop   → integration branch
feature/* → work item branches
release/* → release candidate branches
hotfix/*  → urgent production fixes
GitFlow works well when:
-
multiple people are working in parallel
-
QA and UAT need stable branches
-
releases happen weekly, fortnightly, or on a schedule
-
the team wants explicit release candidate branches
The downside is more branch management and more merge coordination.
Trunk-Based Development
main       → always releasable
feature/*  → short-lived branches merged quickly
This works well when:
-
the team is small
-
deployments are frequent
-
validation and testing are strong
-
the team wants fewer long-lived branches
The downside is that weak test discipline can destabilise the shared branch quickly.
Which One Do We Recommend?
For many org-based Salesforce teams, GitFlow is easier to adopt because it mirrors the familiar Dev → QA → UAT → Prod release model. Trunk-based development can work well for small, mature teams with strong automation.
The important thing is not that one model is always better. The important thing is to choose one model deliberately and make your environments, approvals, and pipeline logic consistent with it.
Pipeline Architecture: What We Recommend
For most growing Salesforce teams, the recommended flow is:
Developer Sandbox
      ↓
Retrieve metadata to Git
      ↓
Feature branch
      ↓
Pull Request validation
      ↓
Merge to develop
      ↓
Deploy source to QA
      ↓
Create release branch
      ↓
Build unlocked package version
      ↓
Install package in UAT
      ↓
Regression testing and signoff
      ↓
Install same package version in Production
Why do we recommend this model?
-
source deploy to QA is flexible and fast for integration testing
-
the package version becomes a stable release artifact
-
UAT validates the exact artifact intended for production
-
production receives the same tested package version
This creates a process that is both practical and controlled. It also works well with source tracking during development while giving you better release traceability later in the flow.
Package.xml vs Source Tracking vs Serpent Workflow
| Category | Package.xml | Source Tracking + Unlocked Packages | Serpent Workflow |
|---|---|---|---|
| Primary model | Manifest-driven deployment | Git-driven development with package-based release promotion | Task-driven workflow built around Git, environments, and release visibility |
| Best for | Hotfixes, targeted deploys, legacy teams | Modern teams wanting versioned releases | Teams of any size wanting speed, visibility, and easier operations |
| Metadata selection | Manual | Source tracking plus Git selection | Guided, task-based, and dependency-aware selection |
| Dependency handling | Manual and error-prone | Better, but still requires discipline | Assisted by metadata analysis and workflow logic |
| Production traceability | Limited | Good when using package versions | Strong visibility across work items, releases, and orgs |
| Rollback clarity | Harder, especially with destructive changes | Better with versioned packages | Clearer through release artefacts, workflow history, and package promotion |
| Hotfix / back-promotion | Useful and often necessary | Still sometimes needs package.xml for production recovery | Supported as part of the release workflow and visibility model |
| Operational overhead | Low at first, high later | Moderate | Lower ongoing overhead because more of the workflow is native and visible |
| Collaboration | Mostly manual | Git-centric, developer-friendly | Developer, admin, tester, and release-manager friendly |
| When we recommend it | Specific edge cases and legacy processes | Recommended default for most modern teams | Recommended when you want the same DevOps principles with much less friction |
Using package.xml vs Source Tracking
Using package.xml
package.xml is the traditional manifest file listing the metadata types and members you want to retrieve or deploy.
Example:
<?xml version="1.0" encoding="UTF-8"?>
<Package xmlns="http://soap.sforce.com/2006/04/metadata">
  <types>
    <members>AccountService</members>
    <name>ApexClass</name>
  </types>
  <types>
    <members>AccountTrigger</members>
    <name>ApexTrigger</name>
  </types>
  <version>61.0</version>
</Package>
Pros:
-
explicit control over what gets deployed
-
works in all org types including production
-
useful for hotfixes and targeted deploys
Cons:
-
manual to maintain
-
easy to miss dependencies
-
does not automatically reflect what changed in the org
-
harder to manage as release scope grows
A lot of teams still use package.xml, and that makes sense historically. For a long time it was the most practical option, especially when source tracking was still immature.
Using Source Tracking
Source tracking lets Salesforce CLI compare what changed in an org relative to local source. It is especially useful in scratch orgs and has become much more practical in modern sandbox-based workflows as the platform has matured.
This area improved a lot after the migration from the old SFDX CLI to the modern sf CLI, and it has continued improving over the last two years.
Typical commands include:
sf project retrieve start
sf project deploy start
Pros:
-
faster feedback during development
-
reduces manual manifest maintenance
-
better developer ergonomics
-
works well when combined with Git-driven promotion
Cons:
-
production does not support source tracking in the same way
-
teams still need a strategy for release versioning
-
partial feature selection can still be awkward without the right tooling
Why We Recommend Source Tracking + Unlocked Packages
For most modern teams, we recommend using source tracking during development and unlocked packages for release promotion.
Why?
-
source tracking is a better day-to-day development experience than manual manifests
-
unlocked packages give you proper release versioning later in the flow
-
production traceability becomes much clearer through package versions
-
rollback and destructive-change handling are easier to reason about
That said, package.xml still matters in edge cases, so the real goal is not purity. The real goal is using the right tool for the right step.
What About Production?
Production is where source tracking limitations become important. You cannot treat production like a scratch org and ask Salesforce to tell you cleanly what changed there over time.
That means production deployments generally depend on:
-
package.xml manifests
-
source directories built from Git
-
unlocked package versions
This is one of the main reasons versioned package promotion is so valuable. It gives production a clearer release identity than source tracking alone can provide there.
We should be careful not to overstate intent here. The practical point is simple: production does not behave like a source-tracked dev org, so teams need another way to make release state explicit. Unlocked packages are one of the best ways to do that.
Selecting Only the Changes You Want
A common pain point with source tracking is this: your developer sandbox contains several unrelated changes, but you only want to move one feature forward.
The manual process usually looks like this:
-
retrieve everything from the sandbox
-
review the changed files in Git
-
select only the metadata relevant to the feature
-
commit just that feature branch scope
Example:
sf project retrieve start
git status
git add force-app/main/default/classes/PricingService.cls
git add force-app/main/default/triggers/OpportunityTrigger.trigger
git add force-app/main/default/flows/Discount_Approval.flow-meta.xml
git commit -m "Feature: pricing approval flow"
The challenge is that dependencies are not always obvious. A Flow may reference a field, a field may depend on a permission set, and a permission set change may be needed to make the feature usable.
This is where teams often either miss metadata or over-deploy extra metadata just to be safe.
With Serpent, this becomes easier because the workflow is built around work items and metadata selection. Serpent can help identify which components belong to a feature, and its Salesforce-trained AI can assist with logical metadata selection and dependency analysis based on the feature description itself.
Delta Deployments vs Full Branch Deployments
When Delta Deployments Make Sense
Delta deployments push only the metadata that changed. They are useful when:
-
validating pull requests quickly
-
promoting small, isolated features
-
reducing validation time in very large orgs
Example using sfdx-git-delta:
sf sgd source delta \
  --to HEAD \
  --from origin/develop \
  --output-dir delta \
  --generate-delta
Then validate or deploy the delta:
sf project deploy validate --source-dir delta --test-level RunLocalTests
sf project deploy start --source-dir delta
When Full Deployments Make More Sense
Full branch deployments push the whole metadata tree or a full branch state. They are better when:
-
handling deletions or destructive changes
-
reverting commits
-
making sure an environment matches a known branch state
-
resetting drift in a shared environment
Example:
sf project deploy start --source-dir force-appThis is important because delta deployments are great when you are mostly adding or modifying metadata. They are less reliable when the branch intent includes deletions, revert commits, or broader consistency resets.
In practice, a strong process uses both:
-
delta deploys for speed
-
full deploys for certainty when the change type requires it
Serpent helps here as well by making the deployment flow less brittle. Instead of every team re-creating this logic in GitHub Actions by hand, the workflow can guide when targeted movement is appropriate and when a broader promotion is safer.
Unlocked Packages for Release Versioning
Even in org-based development, unlocked packages can improve release management significantly.
Instead of deploying a loose set of metadata directly into every higher environment, teams can package a logical set of changes into a versioned release artefact.
That means:
-
clear version numbers for releases
-
easier promotion from UAT to Production
-
better visibility into what is deployed where
-
cleaner dependency handling
-
more predictable rollback planning
Recommended Unlocked Package Flow
For a larger org-based team, the release flow usually looks like this:
Developer Sandbox
      ↓
Retrieve to Git
      ↓
Pull Request validation
      ↓
Deploy source to QA
      ↓
Create release branch
      ↓
Build unlocked package version
      ↓
Install in UAT
      ↓
Regression and approval
      ↓
Install same package version in Production
For a very small team, it can be simpler:
Developer Sandbox
      ↓
Retrieve to Git
      ↓
Pull Request validation
      ↓
Build unlocked package version
      ↓
Install in Staging
      ↓
Promote same package version to Production
Example Commands
sf package create --name SalesApp --package-type Unlocked --path force-app
sf package version create --package SalesApp --wait 20 --installation-key-bypass
sf package install --package 04tXXXXXXXXXXXX --target-org myUATOrg --wait 20
sf package install --package 04tXXXXXXXXXXXX --target-org myProdOrg --wait 20
Why Rollback Is Easier to Reason About
Unlocked packages do not magically solve every rollback problem, especially when data changes are involved. But compared with raw source deployment or package.xml-only promotion, they make rollback easier to understand because:
-
the release is a versioned artefact
-
you know exactly which package version introduced the change
-
you can compare what changed between versions more clearly
-
destructive changes are easier to track in the context of release history
This matters even more in production, where source tracking cannot give you the same visibility it can in development environments.
How to Build This in GitHub Actions
GitHub Actions is a good option for teams who want to understand the mechanics and build their own CI/CD foundation. It integrates directly with your repository, and workflows are defined in YAML files stored alongside the code.
Suggested Branch-to-Environment Mapping
feature/*   → developer work item branches
develop     → source-integrated branch deployed to QA
release/*   → release candidate branches used for package version build
main        → production history
hotfix/*    → urgent production fixes
Full End-to-End GitHub Actions Pipeline Example
The example below shows a practical end-to-end setup using:
-
PR validation into develop
-
automatic source deploy to QA on merge to develop
-
package version build on release/*
-
package install to UAT
-
manual promotion of the same package version to Production
name: Salesforce End-to-End CI/CD

on:
  pull_request:
    branches:
      - develop
  push:
    branches:
      - develop
      - 'release/*'
  workflow_dispatch:
    inputs:
      package_version_id:
        description: 'Unlocked package version id to promote to Production'
        required: false
        type: string

env:
  PROJECT_DIR: force-app
  DELTA_DIR: delta
  QA_ALIAS: qa
  UAT_ALIAS: uat
  PROD_ALIAS: prod
  PACKAGE_NAME: SalesApp

jobs:
  pr-validate:
    if: github.event_name == 'pull_request'
    runs-on: ubuntu-latest

    steps:
      - name: Checkout repository
        uses: actions/checkout@v4
        with:
          fetch-depth: 0

      - name: Install Salesforce CLI
        run: npm install @salesforce/cli --global

      - name: Install plugins
        run: |
          sf plugins install sfdx-git-delta
          sf plugins install @salesforce/plugin-packaging

      - name: Create JWT key file
        run: echo "${{ secrets.SF_JWT_KEY_QA }}" > server.key

      - name: Authenticate to QA validation org
        run: |
          sf org login jwt \
            --client-id ${{ secrets.SF_CLIENT_ID_QA }} \
            --jwt-key-file server.key \
            --username ${{ secrets.SF_USERNAME_QA }} \
            --instance-url ${{ secrets.SF_INSTANCE_URL_QA }} \
            --alias $QA_ALIAS

      - name: Generate delta package
        run: |
          sf sgd source delta \
            --to HEAD \
            --from origin/develop \
            --output-dir $DELTA_DIR \
            --generate-delta

      - name: Show generated delta
        run: |
          echo "Delta contents:"
          find $DELTA_DIR || true

      - name: Run PMD scan
        run: |
          pmd -d $PROJECT_DIR -R category/apex/design.xml -f text || true

      - name: Run ESLint
        run: |
          if [ -f package.json ]; then
            npm ci
            npm run lint || true
          fi

      - name: Validate delta deployment against QA
        run: |
          if [ -d "$DELTA_DIR" ]; then
            sf project deploy validate \
              --source-dir $DELTA_DIR \
              --target-org $QA_ALIAS \
              --test-level RunLocalTests
          else
            echo "No delta generated, validating full source instead."
            sf project deploy validate \
              --source-dir $PROJECT_DIR \
              --target-org $QA_ALIAS \
              --test-level RunLocalTests
          fi

  deploy-to-qa:
    if: github.event_name == 'push' && github.ref == 'refs/heads/develop'
    runs-on: ubuntu-latest

    steps:
      - name: Checkout repository
        uses: actions/checkout@v4
        with:
          fetch-depth: 0

      - name: Install Salesforce CLI
        run: npm install @salesforce/cli --global

      - name: Install plugins
        run: |
          sf plugins install sfdx-git-delta

      - name: Create JWT key file
        run: echo "${{ secrets.SF_JWT_KEY_QA }}" > server.key

      - name: Authenticate to QA
        run: |
          sf org login jwt \
            --client-id ${{ secrets.SF_CLIENT_ID_QA }} \
            --jwt-key-file server.key \
            --username ${{ secrets.SF_USERNAME_QA }} \
            --instance-url ${{ secrets.SF_INSTANCE_URL_QA }} \
            --alias $QA_ALIAS

      - name: Generate delta for QA deploy
        run: |
          sf sgd source delta \
            --to HEAD \
            --from HEAD^ \
            --output-dir $DELTA_DIR \
            --generate-delta || true

      - name: Deploy to QA
        run: |
          if [ -d "$DELTA_DIR" ] && [ "$(find $DELTA_DIR -type f | wc -l)" -gt 0 ]; then
            sf project deploy start \
              --source-dir $DELTA_DIR \
              --target-org $QA_ALIAS \
              --test-level RunLocalTests
          else
            echo "Falling back to full branch deploy"
            sf project deploy start \
              --source-dir $PROJECT_DIR \
              --target-org $QA_ALIAS \
              --test-level RunLocalTests
          fi

  build-package-and-install-uat:
    if: github.event_name == 'push' && startsWith(github.ref, 'refs/heads/release/')
    runs-on: ubuntu-latest
    outputs:
      package_version_id: ${{ steps.capture_version.outputs.package_version_id }}

    steps:
      - name: Checkout repository
        uses: actions/checkout@v4
        with:
          fetch-depth: 0

      - name: Install Salesforce CLI
        run: npm install @salesforce/cli --global

      - name: Install packaging plugin
        run: sf plugins install @salesforce/plugin-packaging

      - name: Create Dev Hub JWT key file
        run: echo "${{ secrets.SF_JWT_KEY_DEVHUB }}" > server.key

      - name: Authenticate to Dev Hub
        run: |
          sf org login jwt \
            --client-id ${{ secrets.SF_CLIENT_ID_DEVHUB }} \
            --jwt-key-file server.key \
            --username ${{ secrets.SF_USERNAME_DEVHUB }} \
            --instance-url ${{ secrets.SF_INSTANCE_URL_DEVHUB }} \
            --alias devhub

      - name: Create package version
        run: |
          sf package version create \
            --package $PACKAGE_NAME \
            --target-dev-hub devhub \
            --wait 30 \
            --installation-key-bypass \
            --code-coverage

      - name: Capture latest package version id
        id: capture_version
        run: |
          VERSION_ID=$(sf package version list --packages $PACKAGE_NAME --target-dev-hub devhub --json | jq -r '.result[0].SubscriberPackageVersionId')
          echo "package_version_id=$VERSION_ID" >> $GITHUB_OUTPUT
          echo "Latest package version id: $VERSION_ID"

      - name: Create UAT JWT key file
        run: echo "${{ secrets.SF_JWT_KEY_UAT }}" > server.key

      - name: Authenticate to UAT
        run: |
          sf org login jwt \
            --client-id ${{ secrets.SF_CLIENT_ID_UAT }} \
            --jwt-key-file server.key \
            --username ${{ secrets.SF_USERNAME_UAT }} \
            --instance-url ${{ secrets.SF_INSTANCE_URL_UAT }} \
            --alias $UAT_ALIAS

      - name: Install package in UAT
        run: |
          sf package install \
            --package ${{ steps.capture_version.outputs.package_version_id }} \
            --target-org $UAT_ALIAS \
            --wait 30 \
            --publish-wait 10 \
            --no-prompt

  promote-to-production:
    if: github.event_name == 'workflow_dispatch' && github.event.inputs.package_version_id != ''
    runs-on: ubuntu-latest
    environment: production

    steps:
      - name: Install Salesforce CLI
        run: npm install @salesforce/cli --global

      - name: Create Production JWT key file
        run: echo "${{ secrets.SF_JWT_KEY_PROD }}" > server.key

      - name: Authenticate to Production
        run: |
          sf org login jwt \
            --client-id ${{ secrets.SF_CLIENT_ID_PROD }} \
            --jwt-key-file server.key \
            --username ${{ secrets.SF_USERNAME_PROD }} \
            --instance-url ${{ secrets.SF_INSTANCE_URL_PROD }} \
            --alias $PROD_ALIAS

      - name: Install approved package in Production
        run: |
          sf package install \
            --package ${{ github.event.inputs.package_version_id }} \
            --target-org $PROD_ALIAS \
            --wait 30 \
            --publish-wait 10 \
            --no-prompt
This is not the only valid GitHub Actions design, but it captures the recommended split between source-based validation in lower environments and package-based promotion into UAT and Production.
Additional Pipeline Practices and Operational Guidance
A CI/CD pipeline is only part of a working Salesforce DevOps process. What often determines success or failure is how teams handle the operational details around development, testing, promotion, and release coordination.
Managing Feature-Level Changes Safely
One challenge in Salesforce development is that sandboxes frequently accumulate multiple changes at once. A developer may be working on two or three features, but only one is ready for promotion.
If you simply retrieve all metadata and deploy it forward, you risk promoting unfinished work.
The safer pattern is:
Developer Sandbox
      ↓
Retrieve all metadata locally
      ↓
Select only the components belonging to the feature
      ↓
Commit those components to a feature branch
      ↓
Submit a pull request for validation
Example workflow:
sf project retrieve start

git checkout -b feature/pricing-update

git add force-app/main/default/classes/PricingService.cls
git add force-app/main/default/triggers/PricingTrigger.trigger
git add force-app/main/default/lwc/pricingWidget

git commit -m "Feature: pricing update"
This ensures the repository reflects a single logical feature rather than a mix of unrelated changes.
The difficulty is that Salesforce metadata is often interconnected. A Flow might depend on:
-
custom fields
-
Apex classes
-
permission sets
-
record types
Missing one of those dependencies can break deployment validation.
Many teams solve this through experience and manual checks. Platforms like Serpent help by analysing metadata relationships and identifying dependencies automatically so the correct set of components moves together.
AI-Assisted Metadata Selection
Recent improvements in developer tooling have introduced AI assistance for dependency analysis.
In practice this means:
-
a feature description can be analysed
-
related metadata components can be detected
-
dependency graphs can be evaluated
-
the most likely metadata scope can be suggested
Serpent includes AI agents trained on Salesforce metadata patterns that helps determine the logical set of components required for a feature, reducing the risk of incomplete deployments.
This does not remove developer control. It simply makes the selection process faster and safer.
Handling Sandbox Drift
Another common issue in Salesforce environments is sandbox drift.
This happens when someone makes a change directly in a shared environment such as QA or UAT that never reaches the Git repository.
Over time the environment diverges from source control.
To detect drift, teams often perform periodic retrieval comparisons:
sf project retrieve start
git diff
If unexpected differences appear, they should be reconciled immediately by committing them to Git or removing them.
Allowing drift to accumulate makes later deployments unpredictable.
Environment Strategy
Each environment should have a clear purpose.
| Environment | Purpose |
|---|---|
| Developer Sandbox | Feature development and early testing |
| QA | Integrated testing across multiple features |
| UAT | Business validation of release candidates |
| Production | Live system |
Problems often arise when environments lose their purpose. If QA becomes another development sandbox, it stops functioning as a reliable integration checkpoint.
Testing Strategy
A robust CI/CD process includes automated tests at multiple levels.
-
unit tests for Apex
-
component tests for LWC
-
integration tests for cross-feature workflows
PR validation pipelines often run targeted tests for speed, while release pipelines run broader test suites.
Example PR validation:
sf project deploy validate \
  --source-dir delta \
  --test-level RunSpecifiedTests
Example release validation:
sf project deploy validate \
  --source-dir force-app \
  --test-level RunLocalTests
The goal is to catch issues early without slowing down developer feedback cycles unnecessarily.
Release Visibility
One of the most underestimated DevOps challenges is simply knowing what is in a release.
Questions teams frequently ask include:
-
Which features are included in the next release?
-
Which components were deployed to QA yesterday?
-
Which package version is currently installed in production?
Without a structured workflow, answering those questions often requires searching across Git history, pipeline logs, and manual release notes.
Serpent addresses this by linking deployments to work items, making releases easier to understand across environments.
Developer Experience
Developer productivity also matters.
Many developers prefer working inside VS Code with the Salesforce extensions and CLI tools.
DevOps platforms should integrate with that workflow rather than forcing developers into entirely separate interfaces.
Serpent includes a VS Code extension so developers can:
-
compare metadata
-
validate deployments
-
manage release tasks
-
deploy changes
This keeps DevOps operations close to the development environment.
Conclusion
Salesforce DevOps is not about one specific tool or one exact pipeline format.
It is about creating a reliable process that allows teams to deliver changes safely and consistently.
Small teams may start with simple pipelines and a single staging environment. Larger organisations require structured environments, versioned releases, and modular packages.
The key principles remain the same:
-
Git should be the source of truth
-
changes should be validated automatically
-
releases should be versioned and traceable
-
environments should remain consistent
Understanding how CI/CD pipelines work under the hood is valuable. But as Salesforce environments grow more complex, coordinating releases across people, environments, and packages becomes the real challenge.
That is where tools like Serpent help teams maintain speed while preserving control, visibility, and release confidence.